Mobile App Sensor Documentation (English Version)
Mobile App Sensor Documentation (English Version)
Version: | 2.1 |
|---|---|
Date: | 2015-09-25 |
Author: | Kantar Media Audiences (DE) |
eMail: |
Content
Method
The Mobile App Sensor can be used for different mobile devices. The library thereby only measures actions within applications. This Sensor does not measure the web usage of a mobile device. For this a different implementation is available (Mobile Sensor), which needs to be included into the respective websites directly.
With the standard procedure a comprehensive tracking of applications and mobile web usage is not possible.
Information for Developers
All spring sensors capture the events in the moment in which they arise. This concept is also implemented in the libraries for the apps, that means that all actions are sent immediately.
In case of any questions concerning this, please contact our support team under KA_DE_support@kantarmedia.com
Integration of Libraries
It could be demanded that the app needs to be measured on several markets. In this case the most recent version of the Mobile App Sensor needs to be integrated for every single market with the corresponding implementation instructions. Spring measurement libs for variant clients had been unified to one, and of course the customized settings are applied based on the different domains internally.
From version 1.1.0 on this is supported through a different naming and a changed package structure. In the following examples are the libs for market MA and market MB. Concerning the naming the following structure must be used
spring-appsensor-<OS>-<MARKET>-<VERSION>
Examples:
- spring-appsensor-iOS-MA-1.1.0.zip
- spring-appsensor-android-MB-1.1.0.zip
The zip file we released will contain the spring measurement lib, possibly the necessary utility lib and corresponding API doc.
Please consider the implementation instructions of the single libraries. Those may be differ (strongly) on the single markets.
Integration of libraries with iOS
In the following example the library of the markets MA is integrated. The header file is needed:
- Spring.h
#import "TestApp.h"

#import "Spring.h"

@implementation TestApp3AppDelegate

@synthesize window = _window;
@synthesize tabBarController = _tabBarController;


Spring *spring;

- (BOOL)application:(UIApplication *)application didFinishLaunchingWithOptions:(NSDictionary *)launchOptions

{

    // --- MA ---------------------------------------------------------------------------------

    spring = [[Spring alloc] initWithSiteAndApplication:@"site" application:@"applicationName"];


    NSMutableDictionary *dict = [NSMutableDictionary dictionaryWithObjectsAndKeys:SPRING_APP_STARTED, SPRING_VAR_ACTION,nil];

    [spring commit:dict];


    self.window.rootViewController = self.tabBarController;

    [self.window makeKeyAndVisible];

    return YES;
}


// ... more code
Integration of library with Android
In the following example the library of themarkets MA is integrated. The corresponding java Class in jar file is needed:
- de.spring.mobile.SpringMobile
package de.spring.android.test;

import java.util.HashMap;
import java.util.Map;

import de.spring.mobile.SpringMobile;


import android.app.Activity;

public class MyActivity extends Activity {

	SpringMobile ma;

	public MyActivity() {
		ma = new SpringMobile("site", "applicationname", getApplicationContext());
	}

	/**
	 * @see android.app.Activity#onStart()
	 */
	@Override
	protected void onStart() {

		Map<String, Object> mapma = new HashMap<String, Object>();
		mapma.put(SpringMobile.VAR_ACTION, SpringMobile.APP_STARTED);
    	ma.commit(mapma);

	}

	// more code ...
}
Release of the Application
The developer should make sure that, before the application goes into the release process, the latest version of the spring library is used (see your specific customer download page).
Features on Platforms
Offline-Mode
For Android and iOS version, Kantar Media Audiences-lib has a feature the so-called "offlineMode". This mode can be switched on and off by using public API: KMA_SpringStreams.offlineMode.
If the lib is configured to offlineMode, KMA_SpringStreams library will hold all requests in a local buffer and send them when the device goes back online.
KMA_SpringStreams lib checks the internet connection regularly by using the iOS Timer and send the data as soon as possible.
Please notice:
- Old requests will be dropped if too many requests pump into local buffer for the limitation in buffer size.
- The default buffer size is 500. (Note: in case of streaming requests only the last request of a singular streaming sequence is stored, in other words it allows for 500 views to be stored)
- The data will be stored in a local file, so the lib will not lose the requests even if the application terminates
- the Kantar Media Audiences-lib tries to send the requests in a fixed rate, 10 seconds by default, and sends them if device is online again
How the library acts when offline-mode is enabled:
- The device will keep trying to empty the ring buffer by attempting to send requests to the measuring system.
- When there is a connection, the requests seamlessly pass through the ring buffer.
- When there is no connection, the requests will be retained indefinitely.
For more information, check the chapter about offline-mode below.
iOS Identifiers
| Device ID (did) | Advertising ID (ai) | Mac ID (mid) | ID_For_Vendor (ifv) | |
|---|---|---|---|---|
| iOS4 | --- | --- | --- | |
| iOS5 | --- | --- | --- | |
| iOS6 | --- | |||
| iOS7 | --- | --- | ||
| iOS8 | --- | --- |
| |
| iOS9 | — |
| — |
|
Considering that the Apple private policy is changing all the time, Kantar Media Audiences libs have to adapt different UDIDs for identifying the end user's devices.
- Since iOS7 the Mac ID is not available anymore,
- Since iOS7 introducing of Advertising ID and ID_For_Vendor
Please attention:
Apple will reject all the applications which retrieve Advertising ID (ai) but with no advertising content provided.
So Advertising-Framework is linked as optional in Kantar Media Audiences lib,
If the Advertising ID should be used as udid, please import Advertising-Framework into your projects.
Migration to iOS9 
URL Scheme White-listing
So if your application is combining with a specific "Panel App" (e.g. Virtualmeter App), please register the URL scheme in your application, the syntax is as following:
<key>LSApplicationQueriesSchemes</key>
     <array>
         <string>**.***.ipm</string> //please change **.*** to the parameters given in your library delivery
         <string>*****PanelApp</string> //please change ***** to the parameters given in your library delivery
     </array>
App Transport Security (ATS)
Migrating from "http" to "https" has to be planed for the more secure communication.
However for this moment, if you decide to enable ATS, a temporary solution can be adapted by adding an exception for Kantar Media Audiences measurement box:
<key>NSAppTransportSecurity</key>
 <dict>
         <key>NSAllowsArbitraryLoads</key>
         <false/>
         <key>NSExceptionDomains</key>
         <dict>
             <key>*****</key> //please change ***** to the parameters given in your library delivery
             <dict>
                 <key>NSIncludesSubdomains</key>
                 <true/>
                 <key>NSTemporaryExceptionAllowsInsecureHTTPLoads</key>
                 <true/>
                 <key>NSExceptionRequiresForwardSecrecy</key>
                 <false/>
             </dict>
         </dict>
     </dict>
Bitcode
Android Identifier
Google Advertising ID
Beginning with Kantar Media Audiences lib 1.6.0, GoogleAdvertisingID is adapted to identify the android devices.
In order to achieve this, please import google-play-services_lib to your application.
Follow the tutorial detailed info: http://developer.android.com/google/play-services/setup.html
- Install the Google Play Services SDK.
- Import the project into your application.
Don't forget to add following items into your project AndroidManifest.xml file:
<meta-data android:name="com.google.android.gms.version" android:value="@integer/google_play_services_version" />
Description of the Mobile App Library Interface
This chapter describes the interface of the Mobile App Sensor exemplarily for all platforms. For explanation the pragramming language java is used. However the function names are the same in any supported platform and their programming language.
public class SpringMobile {

   /** Is sent when the application is started. */
   public static final String APP_STARTED = "spring.STARTED";

   /** Is sent when the application is put into the background. */
   public static final String APP_BACKGROUND = "spring.BACKGROUND";

   /** Is sent when the application is taken into the foreground. */
   public static final String APP_FOREGROUND = "spring.FOREGROUND";

   /** Is sent when the application is closed or finished. */
   public static final String APP_CLOSED = "spring.CLOSED";

   /** The variable for the sending of activities */
   public static final String VAR_ACTION = "ac";

   /**
    * Constructor with mandatory declaration of a website identification
    * and the application name.
    */
   public SpringMobile(String site, String application) { }

   /**
    * By calling this method, all the name-value-pairs
    * of the {@ link map} are sent to the measuring system.
    *
    * @param target A map with all name-value-pairs.
    */
   public void commit(Map<String,String> target) { }

   /**
    * When the value <code>false</code> is specified,
    * the sending of requests to the measuring system is switched off
    * This value is <code>true</code> by default.
    */
   public void setTracking(boolean tracking) { }

   /**
    * Delivers the value <code>true</code> when the tracking
    * is activated, otherwise the value is <code>false</code>.
    */
   public boolean isTracking() { }
}
The interface is basically the same on all platforms. The specifics and an example code can be found in the corresponding chapters on the platforms.
For the installation generally applies:
- Create an object
SpringMobilewith the application name and the website name. (The website name is provided with the library) - For defined actions, call the method
commit(...)with the appropriate variables and values.
Properties of the Libraries
Property |
default |
OS |
Description |
|---|---|---|---|
|
10 sec |
all |
This timeout is set on the HTTP-Connections, that sends an action to the measuring system. |
Predefined Variables
Out of the application, an HTTP request has to be sent to the measuring system.
Variable | Mandatory | Description |
|---|---|---|
ac | No | The action that has been executed. |
The variable: Action (ac)
By using this variable, the measuring system can be informed, which actions have been executed in the application.
Currently, the following actions are understood:
Variable | Description |
|---|---|
| The application has been started. |
| The application was brought to the foreground or has received the focus. |
| The application was brought into the background or does no longer have the focus. |
| The application has been stopped. |
Implementation of an app page request via the action variable (ac)
By using the variable ac, the execution of a content page within an application can be measured also.
Permitted characters are:
- a-z
- A-Z
- 0-9
- Comma “,”
- Point “.”
- Dash “-” and Underscore “_”
Slash "/" is used as separator for hierarchy levels
The assignment of content and construction of booking units is in the responsibility of the supplier/marketer.
Example for this variable are
- sport_football
- mainpage
- 200_543
Information (optional)
The user can be informed at some point that the application monitors the user actions and transmits them to a measuring system. Furthermore, the user must be informed that he has the possibility to switch of the tracking in the application and can contradict this way. (see: Opt-Out)
For this purpose, you can include data privacy information in your language into an appropriate place of your app implementation:
....................................................................................................................................................................................................
....................................................................................................................................................................................................
Mobile App Sensor Measurement: |On/Off|
Opt-Out
The application developer can give users the ability to stop the further tracking of the user actions. For this purpose the library offers the following methods:
/**
 * When the value <code>false</code> is specified, the sending of
 * requests to the measuring system is switched off.
 * This value is <code>true</code> by default.
 */
public void setTracking(boolean tracking) { }
/**
 * Delivers the value <code>true</code> when the tracking
 * is activated otherwise the value is <code>false</code>.
 */
public boolean isTracking() { }
A persistent saving of the opt-out decision in the library is not provided and needs to be implemented by the app developer.
Mobile Support
Should you encounter any issues or problems during the implementation, please send an email to our support team under KA_DE_support@kantarmedia.com with the following information:
- Name
- Description of the problem
- Possibly error messages with error codes
- Platform (version), application name (version)
Supported Platforms
Implementation iOS
The following example shows the basic installation for the iOS platform. When generating the class SpringMobile a site identifier (<site>) has to be indicated, which is shipped together with this documentation and the libraries.
Please note!
At the application start the Spring object has to be instanced one-time and to be used for the whole life cycle of the application
Example
/*
 * Importing SpringMobile
 */
#import "Spring.h"

/*
 * Providing entity
 */
Spring *spring;

/*
 * Generating SpringMobile entity with site id and
 * application name
 */
spring = [[Spring alloc] initWithSiteAndApplication:@"<site>" application:@"myApplication1"];

/*
* Sending the start of the application to the measurement system */
NSMutableDictionary *dict = [NSMutableDictionary dictionaryWithObjectsAndKeys:APP_STARTED,VAR_ACTION,nil];
[spring commit:dict];
...

// OR
/*
 * Sending the action spring.BACKGROUND
 */
NSMutableDictionary *dict = [NSMutableDictionary dictionaryWithObjectsAndKeys:APP_BACKGROUND,VAR_ACTION,nil];
[spring commit:dict];
Example: Implementation of an app page request via the action variable (ac)
/*
 * Importing SpringMobile
 */
#import "Spring.h"

/*
 * Providing entity
 */
Spring *spring;

/*
 * Generating SpringMobile entity with site id and application name
 */
spring = [[Spring alloc] initWithSiteAndApplication:@"<site>" application:@"myApplication1"];

/*
* Sending AC to the measurement system */
NSMutableDictionary *dict = [NSMutableDictionary
dictionaryWithObjectsAndKeys:@"Mainpage",@"ac",nil];
[spring commit:dict];
...
Timeout
With this value, a timeout (in seconds = default: 30 seconds)) for each HTTP request can be configured within the library.
Example:
spring = [[Spring alloc] initWithSiteAndApplication:@"app" application:@"Test App"];
spring.timeout = 30.0; // in seconds
Debug
If this value is set on YES, the library provides debug outputs over the class NSLog.
spring = [[Spring alloc] initWithSiteAndApplication:@"app" application:@"Test App"];
spring.debug = YES;
Output example:
2011-11-25 13:42:52.878 TestApp3[73923:ff07] spring (1.0.3.1)> http://test.2cnt.net/j0=,,,;+,app=Test%20App+did=7ca359bc4c3c6a19;;;?lt=gvf6lykt
2011-11-25 13:42:52.927 TestApp3[73923:ff07] spring (1.0.3.1)> http status code: 200 - no error
2011-11-25 13:42:56.521 TestApp3[73923:1020b] spring (1.0.3.1)> http://test.2cnt.net/j0=,,,;+,app=Test%20App+did=7ca359bc4c3c6a19+ac=spring.BACKGROUND;;;?lt=gvf6m1e1
2011-11-25 13:42:56.559 TestApp3[73923:1020b] spring (1.0.3.1)> http status code: 200 - no error
2011-11-25 13:42:59.388 TestApp3[73923:10013] spring (1.0.3.1)> http://test.2cnt.net/j0=,,,;+,app=Test%20App+did=7ca359bc4c3c6a19+ac=spring.FOREGROUND;;;?lt=gvf6m3lo
2011-11-25 13:42:59.427 TestApp3[73923:10013] spring (1.0.3.1)> http status code: 200 - no error
2011-11-25 13:43:04.554 TestApp3[73923:11f0b] spring (1.0.3.1)> http://test.2cnt.net/j0=,,,;+,app=Test%20App+did=7ca359bc4c3c6a19+ac=spring.BACKGROUND;;;?lt=gvf6m7l5
Implementation of the URL Scheme in iOS
Generally for spring measuring purpose, only some modifications need to be applied in your App, if a Panel App is used in your market.
(This blog may assist your implementation):
Register the URL Scheme accordingly.
In order to register your URL Scheme into your iOS App, you need to edit the Info.plist file under the "Supporting Files" in your project folder, two ways:
you can edit it in any editor, if you do so, please insert the following code:
	<key>CFBundleURLTypes</key>
	<array>
		<dict>
			<key>CFBundleURLName</key>
			<string>***</string>      //please change *** to your URL name, not so important
			<key>CFBundleURLSchemes</key>
			<array>
				<string>***</string>  //very important, please replace
			</array>
		</dict>
	</array>
Or you can edit this in xcode, add an item into
Info.plist, named "URL types", expand "Item 0" under "URL types", and add two items: "URL identifier", "URL Schemes".For "URL identifier", assign your identifier, and for "URL Schemes", add a new item within it named "Item0", REGISTER A UNIQUE URL SCHEME FOR YOUR APP, VERY IMPORTANT!
It should be like the following:

How to use the different Files in the Library Package
| File | Description |
|---|---|
| spring-appsensor-device.a | This is the version that has been compiled with ARM support and which is intended for execution on iOS devices |
| spring-appsensor-simulator.a | This is the version that has been compiled with x86 support and which is intended for execution on iOS simulator |
| spring-appsensor-fat.a | This is a combined version of the two libraries above, which can be executed on both, iOS devices and iOS simulator because it contains code for ARM and x86 execution. This file is called "fat" as it is roughly double the size (because it combines both versions). |
If size does not matter for the app, the "fat" version is the carefree option to be used for execution on simulator and real devices.
Tutorial on how to import KMA measurement Objective-C library into Swift project
In this tutorial, you will find how to import KMA measurement Objective-C library into your Swift project.
The sample will be given with KMA tagging library, the steaming library will be very similar, please adapt the changes on your own project.
- Import the library into your project as before:
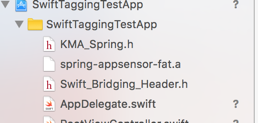
- If you want to import the Objective-C static library into your project, you will need a Bridging-Header file. In your project, create a new file, header file, the content will be like this:
you will need <Foundation/Foundation.h> and import "KMA_Spring.h" or "KMA_SpringStreams"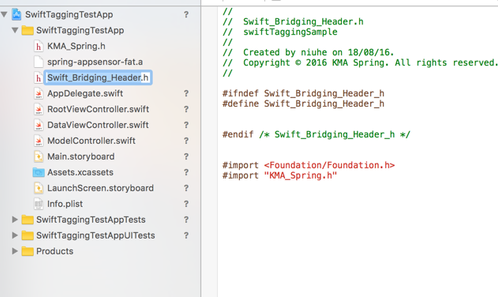
- After import the library in, you will have to link the bridging file as the Objective-C Bridging header in your project,
the setting is in 'Build Settings', search for "Objective-C Bridging Header", and drag the bridging header file in.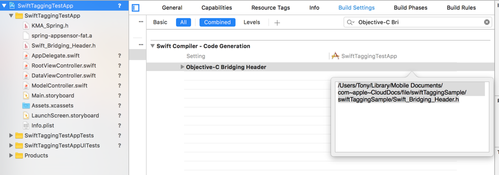
The first 3 steps will allow you the access to the library, the rest will be the implementation in your code just like before:
    var springsensor: KMA_Spring?

    func application(application: UIApplication, didFinishLaunchingWithOptions launchOptions: [NSObject: AnyObject]?) -> Bool {

        springsensor = KMA_Spring(siteAndApplication: "test",application: "testapp");

        springsensor?.debug = true;

        springsensor?.ssl = true;

        let map: NSDictionary = ["stream":"testApp", SPRING_VAR_ACTION:SPRING_APP_STARTED]

        springsensor?.commit(map as [NSObject : AnyObject])

        // Override point for customization after application launch.

        return true

    }
All the resources can be downloaded here:
For tagging: Swift_Bridging_Header.h
For Streaming: Swift_Bridging_Header_Streaming.h
Implementation Android
The following example shows the basic installation for the Android platform. When generating the class SpringMobile a site identifier (<site>) has to be indicated, which is shipped together with this documentation and the libraries.
Example
/**
 * Importing SpringMobile
 */
import de.spring.mobile.SpringMobile;

/**
 * Generating SpringMobile entity with site id and
 * application name
 */
SpringMobile spring = new SpringMobile("<site>", "Application Name", getApplicationContext());

/**
 * Sending the start of the application to the measurement system
 */
Map<String, Object> map = new HashMap<String, Object>();
map.put(SpringMobile.VAR_ACTION, SpringMobile.APP_STARTED);
spring.commit(map);

/*
 * Sending the action spring.BACKGROUND
 */
Map<String, Object> map = new HashMap<String, Object>();
map.put(SpringMobile.VAR_ACTION, SpringMobile.APP_BACKGROUND);
spring.commit(map);
Managing Lifecycle Events in Android Apps
A helper class for the Activities can be used instead of SpringMobile.
Link: http://developer.android.com/reference/android/app/Activity.html
Example Activity:
import android.app.Activity;
import android.os.Bundle;

public class TestActivity extends Activity {
private SpringMobileHelper springHelper;

@Override
public void onCreate(Bundle savedInstanceState) { super.onCreate(savedInstanceState); setContentView(R.layout.main);
springHelper = SpringMobileHelper.getInstance(getApplicationContext()); }

@Override
protected void onStart() { super.onStart(); springHelper.start(); }

@Override
protected void onResume() { super.onResume(); springHelper.resume(); }

@Override
protected void onPause() { super.onPause(); springHelper.pause(); }

@Override
protected void onDestroy() { super.onDestroy(); springHelper.destroy(); }

}
Helper Class:
import java.lang.Thread.State;
import java.util.HashMap;
import java.util.Map;

import android.content.Context;
import de.spring.mobile.SpringMobile;

/**

    This class will help to manage more than one Activity. The Class holds the SpringMobile object and managed the events to it.
    */
    public class SpringMobileHelper {
    private static SpringMobileHelper singelton = null;

private SpringMobile spring = null;

private boolean isStarted = false;
private int foregroundCounter = 0;
private final Thread sendBackground = new Thread() {
@Override
public void run() {
super.run();

while(true) {
synchronized(sendBackground) {
try { wait(); } catch (InterruptedException e) { continue; }

try { sleep(1000); Map<String, Object> map = new HashMap<String, Object>();
map.put(SpringMobile.VAR_ACTION, SpringMobile.APP_BACKGROUND); spring.commit(map); } catch (InterruptedException e) {}

}
}
}
};
{sendBackground.start();}

private SpringMobileHelper() {
}

/**
*

    @param the context
    @return SpringMobileHelper
    */
    public static SpringMobileHelper getInstance(Context context)
    Unknown macro: { if(singelton == null) { singelton = new SpringMobileHelper();
    singelton.spring = new SpringMobile("app", "MoreActivities", context); } return singelton; }

/**

    call by start of activity
    */
    public void start()
    Unknown macro: { if(!isStarted) { isStarted = true; Map<String, Object> map = new HashMap<String, Object>(); spring.commit(map); } }

/**

    call by resume of activity
    */
    public void resume()
    Unknown macro: { foregroundCounter++; if(sendBackground != null && sendBackground.getState() != State.WAITING) { sendBackground.interrupt();
    } else { Map<String, Object> map = new HashMap<String, Object>(); map.put(SpringMobile.VAR_ACTION, SpringMobile.APP_FOREGROUND); spring.commit(map); }
    }

    /**
    * call by pause of activity
    */
    public void pause() {
    foregroundCounter--;
    if(sendBackground != null && sendBackground.getState() != State.WAITING) { sendBackground.interrupt(); } }

    synchronized(sendBackground) { sendBackground.notify(); }
    }

/**

    call by destroy of activity
    */
    public void destroy() {
    if(foregroundCounter == 0) {
    try { sendBackground.join(1000); Map<String, Object> map = new HashMap<String, Object>();
    map.put(SpringMobile.VAR_ACTION, SpringMobile.APP_CLOSED); spring.commit(map); } catch (InterruptedException e) {}
    }
    }

}
Example: Implementation of an app page request via the action variable (ac)
/**
 * Example AC
 */
import de.spring.mobile.SpringMobile;

/**
 * Generating SpringMobile entity with site id and application name
 */
SpringMobile spring = new SpringMobile("<site>", "Application Name", getApplicationContext());

/**
 * Sending AC to the measurement system
 */
Map<String, Object> map = new HashMap<String, Object>();
map.put("ac", "Mainpage");
spring.commit(map);
Android Permissions
The following settings need to be conducted in the file AndroidManifest.xml AndroidManifest.xml:
<uses-permission android:name="android.permission.READ_PHONE_STATE">
</uses-permission>
<uses-permission android:name="android.permission.INTERNET">
</uses-permission>

<meta-data android:name="com.google.android.gms.version" android:value="@integer/google_play_services_version" />
The setting of the permission through the user is not mandatory, but highly recommended.
If the permission READ_PHONE_STATE is set, the device ID and the Android ID are used.
If the permission is not set, only the Android ID is used.
The last one item above is for the registration of google-play-services, which is precondition for retrieving Google Advertising ID.
Two aspects are crucial:
The Android ID is only recognized if the user disposes of a Google account. (This should be the case for all users of the apps, because it is not possible to access the Android Market without a Google account.)
There is a bug in the Android version 2.2, which only occurs in connection with certain providers, where for all affected devices the same Android ID will be delivered. For the study, this would mean that the user identification would become much more difficult.
Timeout
With this value, a timeout (in seconds) for each HTTP request can be configured within the library.
SpringMobile spring = new ("app","TestApp",getApplicationContext());
spring.setTimeout(30); // in seconds
Advise for Implementation when using Android 3.0 and higher Versions
Note: ") Starting from Android 3.0
Starting from Android 3.0
Since Android 3.0 network accesses are not allowed from the main thread anymore. Thus, the Spring.commit () method is achieved in a background thread.
For this reason, please keep the initialization and usage of Spring lib in your main UI thread, Spring lib will not block your GUI display. Otherwise background thread conflicts might pop up.
ProGuard
Therefore it is necessary to add the following lines into the ProGuard configuration file:
-keep class de.spring.** { *; }
-keep class de.spring.** { *; }
-keep class org.apache.** { *; }
If you want to suppress the warnings regarding library-program-class-dependencies , please add to the configuration file
-dontwarn android.webkit.WebView
-dontwarn android.webkit.WebViewClient
Implementation Blackberry
The following example shows the basic installation for the Blackberry platform. When generating the class SpringMobile a site identifier (<site>) has to be indicated, which is shipped together with this documentation and the libraries.
/**
 * Importing SpringMobile
 */
import de.spring.mobile.SpringMobile;

/**
 * Generating SpringMobile entity with site id and
 * application name
 */
SpringMobile spring = new SpringMobile("<site>", "myApplication1");

/**
 * Sending the start of the application to the measurement system
 */
Hashtable target = new Hashtable();
target.put(SpringMobile.VAR_ACTION, SpringMobile.APP_STARTED);
try {
// ...
    spring.commit(target);
} catch (ParamNotSupportedException e) {
    e.printStackTrace();
} catch (IOException e) {
    e.printStackTrace();
}

/**
 * Sending the action spring.BACKGROUND
 */
Hashtable target = new Hashtable();
target.put(SpringMobile.VAR_ACTION, SpringMobile.APP_BACKGROUND);
try {
    spring.commit(target);
} catch (ParamNotSupportedException e) {
    e.printStackTrace();
} catch (IOException e) {
    e.printStackTrace();
}

/**
 * Alternative method
 * Sending the action spring.BACKGROUND with own
 * connection parameters
 */
Hashtable target = new Hashtable();
target.put(SpringMobile.VAR_ACTION, SpringMobile.APP_BACKGROUND);
Hashtable bbprops = new Hashtable();
bbprops.put("deviceside", "true");
try {
    spring.commit(bbprops,target);
} catch (ParamNotSupportedException e) {
    e.printStackTrace();
} catch (IOException e) {
    e.printStackTrace();
}
Example: Implementation of an app page request via the action variable (ac)
/**
 * example AC
*/
Hashtable target = new Hashtable();
target.put("ac", "Mainpage");
try {
// ...
    spring.commit(target);
} catch (ParamNotSupportedException e) {
    e.printStackTrace();
} catch (IOException e) {
    e.printStackTrace();
}
Although the library provides the possiblity of using connection parameters, it is highly recommended to use "spring.commit(Hashtable target)".
While setting the connection parameters (alternative method) changes on high sensitive parts of the library are done. Therefore it is explicitly indicated, that the respective developers are responsible for the correct usage of the library and the correct settings of the connection parameters.
While using connection parameters that are not supported a respective exception is thrown.
As soon the first parameter is indicated within the Blackberry-Connection-Properties- Hashtable (Hashtable bbprops), the automatic search for a functioning connection is stopped.
If using the alternative method "spring.commit(Hashtable bbprops, Hashtable target)" it is assumed, that this was tested for all possible devices and connections.
Implementation Windows Phone
The following example shows the basic installation for the Windows Phone 7 platform. When generating the class SpringMobile a site identifier (<site>) has to be indicated, which is shipped together with this documentation and the libraries.
/*
 * Importing SpringMobile
 */
using spring_mobile_wp7;

/*
 * Generating SpringMobile entity with site id and
 * application name
 */
SpringMobile spring = new SpringMobile("<site>", "myApplication1");
/*
 * Sending the start of the application to the measurement system
 */
Dictionary<String, String> target = new Dictionary<string, string>();
target.Add(SpringMobile.VAR_ACTION, SpringMobile.APP_STARTED);
spring.commit(target);
...
/*
 * Sending the action spring.BACKGROUND
 */
Dictionary<String, String> target = new Dictionary<string, string>();
target.Add(SpringMobile.VAR_ACTION, SpringMobile.APP_BACKGROUND);
spring.commit(target);
Example: Implementation of an app page request via the action variable (ac)
/*
 * Example AC
 */
using spring_mobile_wp7;

/*
 * Generating SpringMobile entity with site id and application name
 */
SpringMobile spring = new SpringMobile("<site>", "myApplication1");
/*
 * Sending AC to the measurement system
 */
Dictionary<String, String> target = new Dictionary<string, string>();
target.Add("ac", "Mainpage");
spring.commit(target);
...
/*
For the measurement we need the device ID. Please set the right for reading the device ID into a config file (WMAppManifest.xml).
...
<Capabilities>
...
<Capability Name="ID_CAP_IDENTITY_DEVICE"/> ...
</Capabilities>
...
Implementation Titanium (not supported at the moment)
The following example shows the basic installation for the Titanium platform. When generating the object SpringMobile a site identifier (<site>) has to be indicated, which is shipped together with this documentation and the libraries.
/*
 * Importing SpringMobile
 */
Ti.include("titaniumSpring.js");

/*
 * Generating SpringMobile entity with site id and
 * application name
 */
var springMobile = new SpringMobile("<site>", "myApplication1");

var request = new Array();
/*
 * Sending the start of the application to the measurement system
 */
request[VAR_ACTION] = APP_STARTED;
var sent = springMobile.commit(request);

/*
 * Example: Sending the action spring.BACKGROUND
 */
var request = new Array();
request[VAR_ACTION] = APP_BACKGROUND;
var sent = springMobile.commit(request);