Streaming Measurement in iOS
This chapter describes the basic use of the sensor for the measurement of streaming content.
Properties of the Library
| Property | Default | Description |
|---|---|---|
| tracking | true | If this property is set to |
| offlineMode | false | If this property is set to |
| debug | false | If the value is set to true, the debug messages are issued by the library |
| timeout | 10 | Timeout Setting for the HTTP-Request |
Lifecycle of the Measurement
This chapter explains step by step the use of the sensor and the measurement of streaming content . The following steps are necessary in order to measure a content.
- Generating the sensor
- Implementation of the adapter
- Beginning of the measurement
- End of the measurement
Generating the Sensor
When you start the app the sensor must be instantiated once. It is not possible to change the site name or the application name after this call.
SpringStreams *spring = [SpringStreams getInstance:@"sitename" a:@"TestApplication"];
The site name and application name is specified by the operator of the measurement system.
From this point on, the method getInstance must be used .
SpringStreams *spring = [SpringStreams getInstance];
Implementation of the Adapter
In principle it is possible to measure any media library with an adapter, that is available within an app to use streaming content .
Therefore the protocol Meta and the interface StreamAdapter must be implemented. The meta object supplies the information regarding the used player, the player version and the screen size.
The library must be able to read continuously the current position on a stream in seconds or the current position of player.
@protocol Meta <NSObject>
@required
-(NSString*) getPlayerName;
-(NSString*) getPlayerVersion;
-(int) getScreenWidth;
-(int) getScreenHeight;
@end


@interface StreamAdapter : NSObject {
}
- (id) init:(NSObject *)stream;
-(NSObject<Meta>*) getMeta;
-(int) getPosition;
-(int) getDuration;
-(int) getWidth;
-(int) getHeight;
@end
Beginning of the Measurement
This chapter explains step by step how a streaming content is transferred to the library for the measurement.
In the library an adapter for class MPMoviePlayerController from the MediaPlayer.framework is settled.
The source code for this implementation can be found in Appendix A and in the library.
The following code block shows an example for the use of the library.
...
MPMoviePlayerController *player = [[[MPMoviePlayerController alloc] initWithContentURL: theURL] autorelease];
...

adapter = [[MediaPlayerAdapter alloc] adapter:player];

NSMutableDictionary * atts = [[NSMutableDictionary alloc] init];
[atts setObject:@"iOS/teststream" forKey:@"stream"]; // mandatory
// [atts setObject:@"4711" forKey:@"cq"]; //optional see implementation guideline
// [atts setObject:@"mobile" forKey:@"ct"]; //optional see implementation guideline/
Stream *stream = [spring track:adapter atts:atts];
[atts release];
...
First, the player and the object needs to be instantiated, that is able to deliver the current position on a stream in seconds. In the second step the adapters must be produced, which implements this requirement accurately.
Then an NSDictionary is generated in order to formulate more detailed information about the stream. Therefore the attribute stream must always be specified
The attribute stream is always required and must be specified for each measurement
Next, the method track is called with the adapter and the description property of the stream. From this point on, the stream is measured by the library as long as the application remains in foreground and the measured data are cyclically transmitted to the measuring system.
When the application goes into the background , all measurements are stopped and closed, i.e. when the application comes to the foreground again, the method track must be called again.
A stream is measured as long as the application is in the foreground. When the application goes into the background, the current status is transmitted to the measurement system and the measurement stops. If the stream should be measured again, when the application will come back to the foreground, the method track must be called again.
End of the Measurement
After the measurement of a stream has been started, this stream is measured by the sensor. The measurement can be stopped by calling the method stop on the stream object. All measurements will be automatically stopped by the library, when the application goes into the background.
// start streaming measurement
Stream *stream = [spring track:adapter atts:atts];
...
// stop measurement programmatically
[stream stop];
If the stream should be measured again, when the application comes to the foreground or after the method stop has been called, the method track must be called again.
Foreground- and Background Actions
Once the application is in the background all measurements in the library are stopped, i.e. when the application goes to the foreground, the measurement on a stream must be restarted.
Ending the application
If the application is closed, the method unload can be called. This call sends the current state of the measurements to the measuring system and then terminates all measurements. This method is automatically called by the library, when the application goes into the background.
...
[[SpringStreams getInstance] unload];
Appendix A
In the following example, the adapter has been implemented for the media player from the standard API.
//
//  MediaPlayerAdapter.m
//  SpringStreams
//
//  Created by Frank Kammann on 26.08.11.
//  Copyright 2011 spring GmbH & Co. KG. All rights reserved.
//

#import <MediaPlayer/MediaPlayer.h>
#import <UIKit/UIKit.h>

#import "SpringStreams.h"


@class MediaPlayerMeta;


@implementation MediaPlayerAdapter

MPMoviePlayerController *controller;
NSObject<Meta> *meta;

- (id)adapter:(MPMoviePlayerController *)player {
    self = [super init:player];

    if (self) {
        meta = [[MediaPlayerMeta alloc] meta:player];
    }
    return self;
}

- (NSObject<Meta>*) getMeta {
    return meta;
}

- (int) getPosition {
    int position = (int)round([controller currentPlaybackTime]);
    // in initialize phase in controller this value is set to -2^31
    if(position < 0) position = 0;
    return position;
}


- (int) getDuration {
    return (int)round([controller duration]);
}

- (int) getWidth {
    return controller.view.bounds.size.width;
}

- (int) getHeight {
    return controller.view.bounds.size.height;
}

- (void)dealloc {
    [meta release];
    [super dealloc];
}


@end


@implementation MediaPlayerMeta

MPMoviePlayerController *controller;

- (id) meta:(MPMoviePlayerController *)player {
    self = [super init];
    if (self) {
        if(player == nil)
            @throw [NSException exceptionWithName:@"IllegalArgumentException"
                                           reason:@"player may not be null"
                                         userInfo:nil];
        controller = player;
    }
    return self;
}

- (NSString*) getPlayerName {
    return @"MediaPlayer";
}

- (NSString*) getPlayerVersion {
    return [UIDevice currentDevice].systemVersion;
}

- (int) getScreenWidth {
    CGRect screenRect = [[UIScreen mainScreen] bounds];
    return screenRect.size.width;
}

- (int) getScreenHeight {
    CGRect screenRect = [[UIScreen mainScreen] bounds];
    return screenRect.size.height;
}

@end
Implementation of the URL Scheme in iOS
Generally for spring measuring purpose, only some modifications need to be applied in your App, if a Panel App is used in your market.
(This blog may assist your implementation):
Register the URL Scheme accordingly.
In order to register your URL Scheme into your iOS App, you need to edit the Info.plist file under the "Supporting Files" in your project folder, two ways:
you can edit it in any editor, if you do so, please insert the following code:
	<key>CFBundleURLTypes</key>
	<array>
		<dict>
			<key>CFBundleURLName</key>
			<string>***</string>      //please change *** to your URL name, not so important
			<key>CFBundleURLSchemes</key>
			<array>
				<string>***</string>  //very important, please replace
			</array>
		</dict>
	</array>
Or you can edit this in xcode, add an item into
Info.plist, named "URL types", expand "Item 0" under "URL types", and add two items: "URL identifier", "URL Schemes".For "URL identifier", assign your identifier, and for "URL Schemes", add a new item within it named "Item0", REGISTER A UNIQUE URL SCHEME FOR YOUR APP, VERY IMPORTANT!
It should be like the following:
How to use the different Files in the Library Package
| File | Description |
|---|---|
| spring-appsensor-device.a | This is the version that has been compiled with ARM support and which is intended for execution on iOS devices |
| spring-appsensor-simulator.a | This is the version that has been compiled with x86 support and which is intended for execution on iOS simulator |
| spring-appsensor-fat.a | This is a combined version of the two libraries above, which can be executed on both, iOS devices and iOS simulator because it contains code for ARM and x86 execution. This file is called "fat" as it is roughly double the size (because it combines both versions). |
If size does not matter for the app, the "fat" version is the carefree option to be used for execution on simulator and real devices.
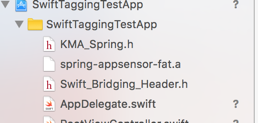
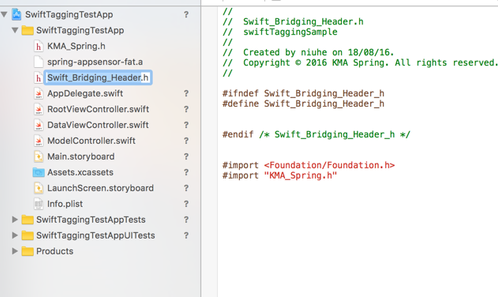
In this tutorial, you will find how to import KMA measurement Objective-C library into your Swift project. The sample will be given with KMA tagging library, the steaming library will be very similar, please adapt the changes on your own project. The first 3 steps will allow you the access to the library, the rest will be the implementation in your code just like before: All the resources can be downloaded here: For tagging: Swift_Bridging_Header.h For Streaming: Swift_Bridging_Header_Streaming.h Tutorial on how to import KMA measurement Objective-C library into Swift project
you will need <Foundation/Foundation.h> and import "KMA_Spring.h" or "KMA_SpringStreams"
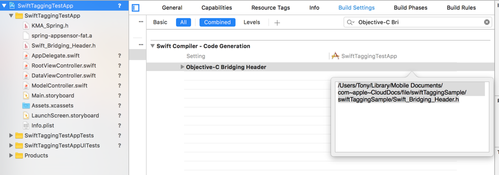
the setting is in 'Build Settings', search for "Objective-C Bridging Header", and drag the bridging header file in. var springsensor: KMA_Spring?
func application(application: UIApplication, didFinishLaunchingWithOptions launchOptions: [NSObject: AnyObject]?) -> Bool {
springsensor = KMA_Spring(siteAndApplication: "test",application: "testapp");
springsensor?.debug = true;
springsensor?.ssl = true;
let map: NSDictionary = ["stream":"testApp", SPRING_VAR_ACTION:SPRING_APP_STARTED]
springsensor?.commit(map as [NSObject : AnyObject])
// Override point for customization after application launch.
return true
}


