Implementation of Stream Measurement
- Former user (Deleted)
- Ralf Cornehl (KASRL) (Unlicensed)
- Former user (Deleted)
Implementation of Stream Measurement
Version | 2.3 |
|---|---|
Date | 11.11.2019 |
Author | Kantar Media Division |
Version history
Version | Date | Author | Comments |
|---|---|---|---|
0.1 | 23.05.2005 | Christopher Wirtz | Initial |
0.5 | 26.05.2005 | Christopher Wirtz | Changes |
1.0 | 02.06.2005 | Christopher Wirtz | Release |
1.1 | 12.03.2007 | Christopher Wirtz | Flash added |
1.2 | 06.07.2009 | Christopher Wirtz | Review/Changes |
1.3 | 14.07.2009 | Christopher Wirtz | Added Example to set the „duration“ manually in ActionScript |
1.4 | 29.06.2010 | Christopher Wirtz | Unload Delay |
1.5 | 02.11.2010 | Frank Kammann | Add Example using a NetStreamAdapter, Streaming Segments and parallel Streams |
1.6 | 14.03.2011 | Frank Kammann | Description of the general Operation (API) and Information on the Security Settings for Flash |
| 1.7 | 17.09.2012 23.10.2012 | Christopher Wirtz Ralf Cornehl | Adapting the position-based Stream Measurement to event-based Measurement Review, Adapting Explanations |
| 1.8 | 04.12.2012 04.12.2012 | Frank Kammann Ralf Cornehl | Mobile Streaming added Review, Adapting Explanations, Translation into English |
| 1.9 | 13.05.2013 13.05.2013 26.09.2013 | Frank Kammann Katrin Joachimsky Ralf Cornehl | Chapter HTML5 added Translation into English Adapting Stream Name Guidelines |
| 2.0 | 22.01.2014 10.11.2014 19.08.2015 | Hendrik Vermeylen Ralf Cornehl Ralf Cornehl | Offline Mode for App Streaming Opt-Out Method URL-scheme added for iOS |
| 2.1 | 25.09.2015 | Ralf Cornehl | iOS9 Support (URL-Scheme-White-listing, ATS, Bitcode) |
| 2.2 | 18.10.2017 | Marc Born | Android Streaming Sensor now uses Singleton template for creation |
| 2.3 | 11.11.2019 | Christopher Kirch | Implementation Streaming for Cordova |
Content
Introduction
Whether news shows, product presentations or online radio programs - all are now using audio and video streams as medium of communication.
Even more than on the static pages, not only the number of visitors but also the behavior of users within a stream is of interest. For how long the clip was actually viewed, which sections were of particular interest and which were not?
When streaming media is called from a web site that is composed by the COM model and/or Flash, it is not only possible to track the number of users, but also watching the users’ behavior.
This document describes the integration of streaming measurement for different applications.
Concept of Measurement
In order to measure any streaming content, a sensor on the client side is necessary, which measures which sequences of the stream were played by the user.
These sequences can be defined by time intervals in seconds - therefore, the player or the playing instance must be able to provide a method for delivering the actual position on the stream in seconds.
The regular reading of the current position allows the tracking of all actions on a stream. Winding operations can be identified, if there are unexpected jumps in reading out the position. Stop or pause operations are identified by the fact, that the current position will not change.
User actions and operations like stop or pause are not measured directly (not player event based) but are instead derived from measuring the current position on stream.
The following chart shows the architecture of the API:
The simplicity of the API and the concept lead to the following features:
- Any desired streaming content, that is able to provide the current position in seconds on the stream, can be measured.
- The API can easily be ported to other programming languages.
- The same method is used in a cross-technology manner, which makes the same streaming content comparable even on different frameworks and technologies.
Basic Use of the API
The following discussion is presented in JavaScript syntax. The procedure is more or less the same in any programming language used.
// 1. Instantiate the API object
var sensors = new SpringStreams("site code");

// 2. Create a description object for streaming content
var desc = {
   "stream":"videos/mystream",
   "duration":600, // in seconds
   "sx":video.width,
   "sy":video.height
};

// 3. Provide a content object
var content = ...; // Any object, which is able to deliver the current position on the stream in seconds

// 4. Register the content with the description object on the sensor
var stream = sensors.track(content, desc);
Remarks:
to 1: Instantiate the API object
 The correct site code must be setup. The site code is delivered by the owner of the streaming solution.
var sensors = new SpringStreams("site code");- One instance of the object
SpringStreamshas to be setup once on the framework. From there, one or more streams can be transmitted to the measurement by thetrackmethod.
to 2: Create a description object for streaming content
In the description object, at least the name of the stream must be given
var desc = { "stream":"videos/mystream", "duration":600 // in seconds };- With the description object more information about the streaming content can be passed to the API. The following variables are permitted or can be understood by the measurement system:
Variable | Optional | Description |
|---|---|---|
| No | Name of the stream, which is ideally given as a hierarchy. Example: In general there is no limitation of the charset – conform to the JSON standard http://json.org – , but for having a better interpretation of stream paths in scores we advice to use the described standards below. The allowable character set for all values in the tagging is UTF-8. It is however recommended to limit to the following characters: a-z The slash "/" is used as a separator within the |
| Yes | The duration must be setup if there's no adapter implementation. |
| Yes | Any value, that makes a statement about the content type can be used |
cq | Yes | Any value, that makes a statement about the content quality can be used For example, the value "programme-ID" can be given to the stream to mark it as an unique content |
| Yes | The width of the stream window - if it's a movie |
| Yes | The height of the stream window - if it's a movie |
to 3: Provide a content object
The only requirement of the streaming API for this object is delivering the current position on a stream in seconds. Depending on the programming language used certain technical software solutions are possible, such as the implementation of interfaces or the implementation of adapter classes.
var content = ...;
to 4: Register the content with the description object on the sensor
- In the next step the streaming content and the description object can be transmitted to the API method
track. From this point on the current position on the stream is tracked. At this point it's possible to measure several parallel streams, where each additional streaming content with the accompanying description object is given to thetrackmethod.
var stream = sensors.track(content, desc);
- The measurement of individual streams may be stopped at any time by calling the method
Stream.stop().
Internal Function Description of the API
After the streaming content with the accompanying description object has been passed to the track method, the current position on the streaming content is queried every 200ms. Internally, all intervals are collected, which were viewed by the user on the stream. At a constant viewing this is one interval.
Once it's determined that the current position changes by more than 1 second to the expected position a start, stop or winding event or even a buffering phase can be assumed. In this case, a new interval is created.
An interval is defined as:
[start, end, timestamp]
| The starting second on the stream |
| The ending second on the stream |
| The client-side time stamp by creating the interval |
All the collected usage information of the measured streams are encoded in an HTTP request and regularly transmitted to the measuring system. The following rules apply:
- at each interaction (start, stop or winding events or buffering phase) an update is sent immediately.
- at a constant viewing at least every 20 seconds.
Data Transport
// System Object
[{"sx":1280,
"sy":1024,
"pl":"FlashPlugin",
"plv":"WIN 10,0,45,2"
},
// Usage Information
{"stream":"spring/teststream",
     "dur":"600",
     "sx":"400",
     "sy":"300",
     "uid":"267fgut",
      "vt":356,
     "pst":[[0,0,"kzog7e"],[22,378,"kzog7e"]]
}]
Two objects are sent by the data transport:
The system object that contains information such as screen resolution, player name and player version.
Variable
Optional?
Description
sxNo
The width of the screen in pixel
syNo
The height of the screen in pixel
plNo
The player name
plvNo
The player version
The usage information of a measurement
Variable
Optional?
Description
plvNo
The player version
streamNo
The stream name
dur,durationNo, if it isn't a live stream.
The stream length in seconds
sxNo
The width of the stream window in pixel or the value
0syNo
The height of the stream window in pixel or the value
0uidNo
The unique Id of the viewing sequence
vtNo
The view time in seconds. It's measured from the call to the method
SpringStreams.track(...)pstNo
The play states. The list of viewing intervals on the stream.
The description of the Encoding for the HTTP request is not part of this documentation. The request is designed in a manner that the variables are still clearly identifiable during debugging activities.
Implementation via Javascript for any Player (also proprietary ones)
Prior to using the springStreams-functions the Javascript-library must be loaded.
This is achieved by the following script-tag:
<script src=".../springstreams.js"></script>
The springStreams-functions are provided by the class SpringStreams. The code of a site will be passed on with the creation of an object of this class:
var sensors = new SpringStreams("test");
![]()
test = The site code in this case is “test”. You have to replace the site code "test" by the site code (unique name provided by Kantar) for the measured site.
To measure any player – even proprietary ones – an adapter to the specific player can be used to pass on data to the sensors of the measurement system. This adapter provides the following three functions:
var myAdapter = {

	"getMeta" : function(id) {
		return {
			"pl" :"own player",
			"plv" :"version1",
			"sx" : screen.width,
			"sy" : screen.height
		}
	},
	"getDuration" : function(id) {
		return streamlength in seconds;
	},
	"getPosition" : function(id) {
		return new Date().getTime() / 1000;
	}
};
1. The function getMeta is used to acquire a description of the player and the available screen area. By calling this function a return of an object with the following attributes is expected:
| player description |
| player version |
| screen width in pixel |
| screen height in pixel |
2. The function getDuration is used to acquire the total duration of the stream in seconds. If this cannot be done (because it is e.g. a live stream) 0 should be returned.
3. The function getPosition is used to acquire the current position in the stream. The function delivers the current play position in seconds. This function is also used to determine the intervals within the streams being played, skipped or stopped.
By calling the object to be measured (from the first parameter of the call to sensors.track(…)) it will be transmitted to all functions.
The self-created adapter can now be used for the measurement:
In the next step the stream content, the description object and the adapter can be transmitted to the API method track.
sensors.track(someObject, desc, myAdapter);
The measurement can be monitored by using the method debug on the SpringStreams object:
sensors.debug = function(v) {
        window.status = " " + v;
}
Upon each transmission of the sensor to the measurement system this method is attached as a parameter (string) to the URL called.
SpringStreams does not intervene with the event model of the surrounding document. Therefore it is necessary to notify the sensors of any termination event of the streams by using events outside of the player. The most simple option for such a method is the insertion of an unload function by calling the method sensors.unload(), when the website is left by the user:
function unload() {
        sensors.unload();
}
Because the browser will close the web site after the unload sequence is finished, it is possible that the closing counting impulse was not committed. An improvement can be achieved by inserting a piece of code at the end of the unload sequence.
function unload() {
	sensors.unload();
        // give time for submission
	var start= new Date(); var now = null; do now = new Date();
        while(now-start < 100);
}
To do so, this function can be added into the body tag:
<body onunload="unload();">
Single streams can also be terminated directly, for example by changing the play list:
var stream = sensors.track(someObject, desc, myAdapter);
...
stream.stop();
For other embedded players than the WMP, an adapter can be used. Find below an example for the Real Player with the id rvplayer:
sensors.track(rvplayer, description, sensors.RVStreamAdapter);
Example for a proprietary player
<html>
<head>
<title>spring sensors</title>
<script src="springstreams.js"></script>
</head>
<body onunload="unload();">
<script type="text/javascript">

var sensors = new SpringStreams("test");
var adapter = {
	"getMeta" : function() {
		return {
			"pl" :"own player",
			"plv" :"version1",
			"sx" : screen.width,
			"sy" : screen.height
		}
	},
	"getDuration" : function() {
		return streamlength in seconds;
	},
	"getPosition" : function() {
		return new Date().getTime() / 1000;
	}
};

var desc = {
	"stream": "videos/teststream"
}

sensors.track("someid", desc, adapter);

// uncomment for debugging
//	sensors.debug = function(v) {
//		window.status = v;
//	}

function unload() {
	sensors.unload();
        // give time for submission
	var start= new Date(); var now = null; do now = new Date();
        while(now-start < 100);
}
</script>
</body>
Implementation via Javascript (Windows Media player)
Prior to using the springStreams-functions the Javascript-library must be loaded.
This is achieved by the following script-tag:
<script src=".../springstreams.js"></script>
The springStreams-functions are provided by the class SpringStreams. The code of a site will be passed on with the creation of an object of this class:
var sensors = new SpringStreams("test");
![]()
test = The site code in this case is “test”. You have to replace the site code “test” by the site code (unique name provided by Kantar) for the measured site.
A media player embedded into the website can now be measured directly. For this, the object which is to be measured is required. In most cases this will be available through the id of the object’s tag. In the following example an object with the ID wmplayer with a reference to the Windows Media Player is being used.
sensors.track(wmplayer, {});
Beyond the ID of the object a number of descriptive information can be passed on in form of a JavaScript object:
var description = {
	"stream": "videos/teststream"
	"desc": "some additional description"
};
sensors.track(wmplayer, description);
It is possible to include more additional attributes to the description. The declaration of stream with the name or the hierarchy of the stream is expected as a minimum.
More than one object can be measured.
Example Windows Media Player
<html>
<head>
<title>spring sensors</title>
<script src="springstreams.js"></script>
</head>
<body onunload="unload();">

<SCRIPT type="text/javascript">
      if(-1 != navigator.userAgent.indexOf("MSIE"))
      {
        document.write('<OBJECT id="wmplayer" width="435" height="326" CLASSID="CLSID:6BF52A52-394A-11d3-B153-00C04F79FAA6" type="application/x-ms-wmp">');
        document.write('                <param name="URL" value="http://wstreaming.zdf.de/zdf/veryhigh/070912_iaa_mim.asx">');
        document.write('                <param name="AutoStart" VALUE="1">');
        document.write('                <param name="ShowStatusBar" VALUE="1">');
        document.write('</object>');
     }
      else  {
       document.write('<OBJECT id="wmplayer" width="435" height="326" type="application/x-ms-wmp">');
       document.write('                 <param name="URL" value="http://wstreaming.zdf.de/zdf/veryhigh/070912_iaa_mim.asx">');
       document.write('                 <param name="AutoStart" VALUE="1">');
       document.write('                 <param name="ShowStatusBar" VALUE="1">');
       document.write(' </object>');
      }
    </SCRIPT>

<script type="text/javascript">

// "test" is the name of the tracked website
var sensors = new SpringStreams("test");

// wmplayer is the id of the stream above
sensors.track(wmplayer, {"stream":"videos/teststream"});

// uncomment for debugging
//sensors.debug = function(v) {
//	window.status = v;
//}

function unload() {
	sensors.unload();
        // give time for submission
	var start= new Date(); var now = null; do now = new Date();
        while(now-start < 100);
}
</script>
</body>
Implementation via HTML5
Before using the springstreams-functions, the javascript library has to be uploaded. This is done via the following script-tag:
<script src=".../springstreams.js"></script>
The springstreams-functions are available via SpringStreams class. During creation of an object in this class, the website-identification is transferred:
var sensors = new SpringStreams("test");
![]()
test is the identification of the website in this case. This identification has to be replaced by the own identification provided by Kantar.
A video- or audio element (see: http://www.w3schools.com/tags/ref_av_dom.asp) embedded into the website can now be measured directly. In order to perform the measurement, the object to be measured is needed. Usually this is available via the id of the object-tag. In this example, the object with the ID video5 is used with a reference to an HTML video element.
sensors.track(video5, {});
In addition to the ID of the object to be measured, descriptive information concerning the object in form of Javascript-object can be indicated:
var description = {
    "stream": "videos/teststream"
    "desc": "some additional description"
};
sensors.track(video5, description);
There is the possibility to add additional attributes to the description. Minimum the identification of stream indicating the name/hirarchy of the stream is expected.
Example HTML5 video
<!DOCTYPE html>
<html lang="en">
<head>
  <title>HTML5 Video Example</title>
  <script src="./springstreams.js"></script>
</head>
<body onunload="unload()">
<script type="text/javascript">
    var sensors = new SpringStreams("test");
</script>

   <div align="center">
    <video id='video' controls preload='none' >
      <source id='mp4' src="./wetter.ard.20101209.mp4" type='video/mp4; codecs="avc1, mp4a"'></source>
      <p>Your user agent does not support the HTML5 Video element.</p>
    </video>
   </div>

    <script type="text/javascript">
    var description = {
        "stream":"videos/news/wetter.ard.20101209.mp4"
    };

    var handle = sensors.track(video, description, sensors.HTML5Adapter);
    function unload() {
      sensors.unload();
    }

</script>
</body>
</html>
Implementation in Flash
The implementation in Flash is similar to the one in Javascript. To use the springStreams functions the library springstreams.as3.swc (resp. springstreams.as2.swc for Actionscript2) is embedded into the application.
Now the springStreams-functions are available via the class SpringStreams. When an object of this class is created, the name of the website is being passed on:
var sensors:SpringStreams = new SpringStreams("test");
![]()
test = The site code in this case is “test”. You have to replace the site code “test” by the site code (unique name provided by Kantar) for the measured site.
The measurements are passed on via an http call to the measurement systems. In the case that this call should be done via SSL (HTTPS) this can be achieved by passing on this information to the sensor:
var sensors:SpringStreams = new SpringStreams("test", true);
A NetStream object can now be measured directly:
sensors.track(ns,{});
Beyond the ID of the object a number of descriptive information can be passed on as a JavaScript object:
var description:Object = {
	"stream": "videos/teststream",
	"desc": "some additional infos",
	"sx": video.width,
	"sy": video.heigth,
};
sensors.track(ns, description);
It is possible to include more additional attributes to the description. The declaration of stream with the name of the stream or the hierarchy and sx respectively sy with the sizing description of the visible area is expected as a minimum.
Requests to the measurement system can be monitored via the ActionScript function trace in the debug environment.
The class SpringStreams defines a function SPRING_UNLOAD via the Flash class ExternalInterface (if available). Analogous to the Javascript version, this function can be used to signal the termination of the runtime environment. This can be implemented as follows:
<body onunload="unload()">
...
function unload() {
   FlexProject.SPRING_UNLOAD();
}
Because the browser will close the web site after the unload sequence is finished, it is possible, that the closing counting impulse was not initiated. An improvement will be reached by inserting a part of a little application at the end of the unload sequence, which will not be noticed by customers.
function unload() {
	FlexProject.SPRING_UNLOAD();
        // give time for submission
	var start= new Date(); var now = null; do now = new Date();
        while(now-start < 100);
}
FlexProject is the ID of the flash object. If the Flash application already uses an unload mechanism, this mechanism can call the static function SpringStreams.unload().
Use as an Embedded Player and Security Settings
If the player should be used as Embedded Player on an other website, the security settings have to be respected.
The following settings must be setup (siehe: ExternalInterface#addCallback())
Set in the HTML page at the object tag for the SWF file the following parameters:
<param name="allowScriptAccess" value="always" />
Paste in the SWF file the following ActionScript code:
flash.system.Security.allowDomain( sourceDomain )
At absence of these settings, a security error appears in the API, because the trial of registering the SPRING_UNLOAD() function on the website will fail. This error is handled by the API and will be ignored. However, it isn't essential for the proper functioning of the measurement.
Furthermore, for the proper functioning the entry of the attribute onunload="..." in the body tag is necessary in order to report the leaving of the side to the API. At absence of these settings, it's possible that the last event at the end of the measurement is no longer transmitted to the measurement system.
Example integration in Flash
 var nsClient:Object = {};
 nsClient.onMetaData = ...
 nsClient.onCuePoint = ...

 nc = new NetConnection();
 nc.connect(null);

 ns = new NetStream(nc);
 ns.play(streamlocation);
 ns.client = nsClient;

 video = new Video();
 video.attachNetStream(ns);

 addChild(video);

 var tracker:SpringStreams = new SpringStreams("test");
 tracker.track(ns,{"stream":"videos/teststream","sx":video.width,"sy":video.height});
The determination of the stream’s total duration is achieved by an intermediate stream-client, which accesses all meta-events of the stream. This stream-client transparently routes all events to the already registered client (nsClient in the above example).
A meta event (onMetaData) containing an info-object is expected. The attribute duration (info.duration) is requested from this info-object and interpreted as the length of the stream.
If this information should not be provided by your streams, the duration of the stream can be assigned externally (in seconds).
via the stream reference:
var nsClient:Object = {};
 nsClient.onMetaData = ...
 nsClient.onCuePoint = ...

 nc = new NetConnection();
 nc.connect(null);

 ns = new NetStream(nc);
 ns.play(streamlocation);
 ns.client = nsClient;

 video = new Video();
 video.attachNetStream(ns);

 addChild(video);

 var tracker:SpringStreams = new SpringStreams("test");
 var stream:Stream = tracker.track(ns,{"stream":"videos/teststream","sx":video.width,"sy":video.height});

 stream.setDuration(600/*10 minutes*/);
Measurement for any Streaming Content in Adobe Flash
As described in the last chapter, you need a library for a flash.net.NetStream object to measure a streaming content. Inside the measurement, the actual position on the stream object will be readout.
The measurement is constantly calling the property NetStream.time.
var net:NetConnection = new NetConnection();
net.connect(null);
var ns:NetStream = new NetStream(net);
var currentPosition:Number = ns.time;
With this knowledge it is possible to measure any streaming object, where the actual position in seconds on the stream is transmitted.
For this you have to implement an own NetStream object and overwrite the call ns.time.
In the following example a NetStream adapter for the flash.media.Sound object is implemented.
package
{
import flash.media.SoundChannel;
import flash.net.NetConnection;
import flash.net.NetStream;

public class SoundNetStreamAdapter extends NetStream
{
	private var channel:SoundChannel;

	public function SoundNetStreamAdapter(net:NetConnection, c:SoundChannel)
	{
		super(net);
		channel = c;
	}

	override public function get time():Number {
            // return the position in seconds
		return channel.position/1000;
	}

}
}
This adapter is also a NetStream object and can be transmitted to the streaming library. By implementing, the property time is overwritten. This property delivers the actual position in seconds. This value is divided by 1000 because the SoundChannel object delivers milliseconds instead of seconds. This is necessary to adapt the interface description of the NetStream object.
The length of the stream is taken by the property Sound.length, transformed to seconds and is written into the description object with the name duration.
var tracker:SpringStreams = new SpringStreams("test");

var s:Sound = new Sound();
s.load(new URLRequest("file:///pathto/sound.mp3"));

var desc:Object = {
	"stream":"sounds/sound.mp3",
	"sx":0,"sy":0,
};

var nc:NetConnection = new NetConnection();
nc.connect(null);

var ns:NetStream = new SoundNetStreamAdapter(nc, s.play());
var stream:Stream = tracker.track(ns, desc);
stream.setDuration(s.length/1000); // duration in seconds
Advanced Topics
Segmentation of Streams
Possibly there is a need for a deeper/different segmentation of streams. This can be desirable in case of a live stream or recorded streams with several content parts, so that the individual segments or parts of the stream can be distinguished.
This can also be realized with the library by measuring each consignment separately. To do this, the player needs to know when and what is broadcasted. It simply needs something like a program structure or "play list".
Example for the measurement of individual segments or parts on a live stream
 var nsClient:Object = {};
 nsClient.onMetaData = ...
 nsClient.onCuePoint = ...

 nc = new NetConnection();
 nc.connect(null);

 ns = new NetStream(nc);
 ns.play(streamlocation);
 ns.client = nsClient;

 video = new Video();
 video.attachNetStream(ns);

 addChild(video);

// 20:00 - 20:15 Tagesschau
// 20:15 - 21:00 PlusMinus
var tracker:SpringStreams = new SpringStreams("test");
// 20:00
var stream:Stream = tracker.track(ns,{"stream":"livestreams/ard/Tagesschau","sx":video.width,"sy":video.height});

// 20:15
stream.stop();
stream = tracker.track(ns,{"stream":"livestreams/ard/PlusMinus","sx":video.width,"sy":video.height});
Several Streams in parallel Measurement
The library is able to measure several streams in parallel. All the streams which have been started can be measured directly by being transmitted with the method “track” to the measurement of streaming.
Example for the measurement of two parallel streams
...
ns1 = new NetStream(...);
...
ns2 = new NetStream(...);
...
var tracker:SpringStreams = new SpringStreams("test");
var stream1:Stream = tracker.track(ns1,{"stream":"streams/stream1","sx":video.width,"sy":video.height});
var stream2:Stream = tracker.track(ns2,{"stream":"streams/stream2","sx":video.width,"sy":video.height});
Adapting the position-based stream measurement to event-based measurement.
To adapt the standard position based stream measurement to an event-based model an adapter can be used to negotiate between the different models. The adapter allows to the event-based left side (the client side) to signal events like Start and Stop and mediates these events to stream positions at the right side. The mediation is simply done by increasing a simulated stream position internally using a timer for all states where the stream is playing (after the Start event etc).
function EventAdapter(pInfo, pVersion) {
	var playerInfo = pInfo;
	var playerVersion = pVersion;

	this.onStart = onStart;
	this.onStop  = onStop;
	this.onPause = onPause;
	this.onResume = onResume;
	this.onProgress = onProgress;
	this.setDuration = setDuration;

	var timer = setInterval(collect, 1000);

	var state = 0;
	var position = 0;

	function collect() {
		if(state == 1) position ++;
	}


	/* external API (left side) */
	function onStart() {
		state = 1;
		position = 0;
	}


	function onStop() {
		state = 0;
		position = 0; // most players rewind on stop
	}


	function onPause() {
		state = 2;
	}


	function onResume() {
		state = 1;
	}


	/*
	 * sets the progress o the stream in seconds
	 * @param v the progress in seconds
	 * @return
	 */

	function onProgress(v) {
		if(typeof v != 'number') {
			v = parseInt(v);
		}

		if(v >= 0) position = v;
	}


	function setDuration(v) {
		if(typeof v != 'number') {
			v = parseInt(v);
		}

		if(v >= 0)
			duration = v;
	}


	/*  internal API (right side) */
	this.getMeta = getMeta;
	this.getDuration = getDuration;
	this.getPosition = getPosition;

	function getMeta(v) {
		return {
			"pl" : playerInfo,
			"plv": playerVersion,
			"sx" : screen.width,
			"sy" : screen.height
		}
	}


	function getDuration(v) {
		return duration;
	}

	function getPosition(v) {
		return position;
	}

}
To use the adaptor it is instantiated with the player-information
var adapter = new EventAdapter("myOwnPlayer","V2.2");
and then added to the sensor using the track method:
sensors.track("stream1", desc, adapter);
The full example is
<html>
<head>
<script src="springstream.js"></script>
<script src="eventadapter.js"></script>
</head>
<body onunload="unload();">
<form name="f"><input type="text" name="t" size="120"/></form>
<hr>
<form name="player">
<!--
example shows how to control the eventadapter using input-buttons
-->
<input type="submit" value="Start" onClick="adapter.onStart(); return false;"/>
<input type="submit" value="Stop" onClick="adapter.onStop(); return false;"/>
<input type="submit" value="Pause" onClick="adapter.onPause(); return false;"/>
<input type="submit" value="Resume" onClick="adapter.onResume(); return false;"/>
<input type="text" name="position"/>
<input type="submit" value="<- setPosition" onClick="adapter.onProgress(player.position.value); return false;"/>
</form>
<script type="text/javascript">
var sensors = new SpringStreams("test");
var adapter = new EventAdapter("myOwnPlayer","V2.2");
adapter.setDuration(1000); // duration of the stream in seconds
var desc = {
"stream": "teststream"
}
sensors.track("stream1", desc, adapter);
sensors.debug = function(v) {
f.t.value = v;
}
function unload() {
sensors.unload();
// give time for submission
var start= new Date(); var now = null; do now = new Date(); while(now-start < 100);
}
</script>
</body>
</html>
Mobile App Streaming
Features on Platforms
Offline-Mode
For Android and iOS version, Kantar Media Audiences-lib has a feature the so-called "offlineMode". This mode can be switched on and off by using public API: KMA_SpringStreams.offlineMode.
If the lib is configured to offlineMode, KMA_SpringStreams library will hold all requests in a local buffer and send them when the device goes back online.
KMA_SpringStreams lib checks the internet connection regularly by using the iOS Timer and send the data as soon as possible.
Please notice:
- Old requests will be dropped if too many requests pump into local buffer for the limitation in buffer size.
- The default buffer size is 500. (Note: in case of streaming requests only the last request of a singular streaming sequence is stored, in other words it allows for 500 views to be stored)
- The data will be stored in a local file, so the lib will not lose the requests even if the application terminates
- the Kantar Media Audiences-lib tries to send the requests in a fixed rate, 10 seconds by default, and sends them if device is online again
How the library acts when offline-mode is enabled:
- The device will keep trying to empty the ring buffer by attempting to send requests to the measuring system.
- When there is a connection, the requests seamlessly pass through the ring buffer.
- When there is no connection, the requests will be retained indefinitely.
For more information, check the chapter about offline-mode below.
iOS Identifiers
| Device ID (did) | Advertising ID (ai) | Mac ID (mid) | ID_For_Vendor (ifv) | |
|---|---|---|---|---|
| iOS4 | --- | --- | --- | |
| iOS5 | --- | --- | --- | |
| iOS6 | --- | |||
| iOS7 | --- | --- | ||
| iOS8 | --- | --- |
| |
| iOS9 | — |
| — |
|
Considering that the Apple private policy is changing all the time, Kantar Media Audiences libs have to adapt different UDIDs for identifying the end user's devices.
- Since iOS7 the Mac ID is not available anymore,
- Since iOS7 introducing of Advertising ID and ID_For_Vendor
Please attention:
Apple will reject all the applications which retrieve Advertising ID (ai) but with no advertising content provided.
So Advertising-Framework is linked as optional in Kantar Media Audiences lib,
If the Advertising ID should be used as udid, please import Advertising-Framework into your projects.
Migration to iOS9
URL Scheme White-listing
So if your application is combining with a specific "Panel App" (e.g. Virtualmeter App), please register the URL scheme in your application, the syntax is as following:
<key>LSApplicationQueriesSchemes</key>
     <array>
         <string>**.***.ipm</string> //please change **.*** to the parameters given in your library delivery
         <string>*****PanelApp</string> //please change ***** to the parameters given in your library delivery
     </array>
App Transport Security (ATS)
Migrating from "http" to "https" has to be planed for the more secure communication.
However for this moment, if you decide to enable ATS, a temporary solution can be adapted by adding an exception for Kantar Media Audiences measurement box:
<key>NSAppTransportSecurity</key>
 <dict>
         <key>NSAllowsArbitraryLoads</key>
         <false/>
         <key>NSExceptionDomains</key>
         <dict>
             <key>*****</key> //please change ***** to the parameters given in your library delivery
             <dict>
                 <key>NSIncludesSubdomains</key>
                 <true/>
                 <key>NSTemporaryExceptionAllowsInsecureHTTPLoads</key>
                 <true/>
                 <key>NSExceptionRequiresForwardSecrecy</key>
                 <false/>
             </dict>
         </dict>
     </dict>
Bitcode
Android Identifier
Google Advertising ID
Beginning with Kantar Media Audiences lib 1.6.0, GoogleAdvertisingID is adapted to identify the android devices.
In order to achieve this, please import google-play-services_lib to your application.
Follow the tutorial detailed info: http://developer.android.com/google/play-services/setup.html
- Install the Google Play Services SDK.
- Import the project into your application.
Don't forget to add following items into your project AndroidManifest.xml file:
<meta-data android:name="com.google.android.gms.version" android:value="@integer/google_play_services_version" />
Streaming Measurement in iOS
This chapter describes the basic use of the sensor for the measurement of streaming content.
Properties of the Library
| Property | Default | Description |
|---|---|---|
| tracking | true | If this property is set to |
| offlineMode | false | If this property is set to |
| debug | false | If the value is set to true, the debug messages are issued by the library |
| timeout | 10 | Timeout Setting for the HTTP-Request |
Lifecycle of the Measurement
This chapter explains step by step the use of the sensor and the measurement of streaming content . The following steps are necessary in order to measure a content.
- Generating the sensor
- Implementation of the adapter
- Beginning of the measurement
- End of the measurement
Generating the Sensor
When you start the app the sensor must be instantiated once. It is not possible to change the site name or the application name after this call.
KMA_SpringStreams *spring = [KMA_SpringStreams getInstance:@"sitename" a:@"TestApplication"];
The site name and application name is specified by the operator of the measurement system.
From this point on, the method getInstance must be used .
KMA_SpringStreams *spring = [KMA_SpringStreams getInstance];
Implementation of the Adapter
In principle it is possible to measure any media library with an adapter, that is available within an app to use streaming content .
Therefore the protocol Meta and the interface StreamAdapter must be implemented. The meta object supplies the information regarding the used player, the player version and the screen size.
The library must be able to read continuously the current position on a stream in seconds or the current position of player.
@interface KMA_Player_Meta : NSObject<NSCoding, NSCopying> {
}
@property (retain,readwrite) NSString *playername;
@property (retain,readwrite) NSString *playerversion;
@property (assign,readwrite) int screenwidth;
@property (assign,readwrite) int screenheight;

@end

@protocol KMA_StreamAdapter
@required
-(KMA_Player_Meta*) getMeta;
-(int) getPosition;
-(int) getDuration;
-(int) getWidth;
-(int) getHeight;
@end
Beginning of the Measurement
This chapter explains step by step how a streaming content is transferred to the library for the measurement.
In the library an adapter for class AVPlayerViewController from the AVKit ramework is settled.
The source code for this implementation can be found in Anhang A and in the library.
The following code block shows an example for the use of the library.
...
@property (strong,nonatomic) AVPlayerViewController *player;
...

player = [[AVPlayerViewController alloc] init];
player.player = [AVPlayer playerWithURL:url];

self.player.view.frame = self.videoPlaceholder.frame;
[self.view addSubview:self.player.view];

KMA_MediaPlayerAdapter *adapter = [[KMA_MediaPlayerAdapter alloc] adapter:self.player];
//Call track to track the video player

NSMutableDictionary * atts = [[NSMutableDictionary alloc] init];
[atts setObject:@"live/iOS/teststream" forKey:@"stream"]; //mandatory
// [atts setObject:@"test" forKey:@"cq"]; //optional see implementation guideline
// [atts setObject:@"1369" forKey:@"vt"]; //optional see implementation guideline
// [atts setObject:@"testSiteName" forKey:@"sitename="]; //optional see implementation guideline
Stream *stream = [self.spring track:adapter atts:atts];
[atts release];
...
First, the player and the object needs to be instantiated, that is able to deliver the current position on a stream in seconds. In the second step the adapters must be produced, which implements this requirement accurately.
Then an NSDictionary is generated in order to formulate more detailed information about the stream. Therefore the attribute stream must always be specified
The attribute stream is always required and must be specified for each measurement
Next, the method track is called with the adapter and the description property of the stream. From this point on, the stream is measured by the library as long as the application remains in foreground and the measured data are cyclically transmitted to the measuring system.
When the application goes into the background , all measurements are stopped and closed, i.e. when the application comes to the foreground again, the method track must be called again.
A stream is measured as long as the application is in the foreground. When the application goes into the background, the current status is transmitted to the measurement system and the measurement stops. If the stream should be measured again, when the application will come back to the foreground, the method track must be called again.
End of the Measurement
After the measurement of a stream has been started, this stream is measured by the sensor. The measurement can be stopped by calling the method stop on the stream object. All measurements will be automatically stopped by the library, when the application goes into the background.
// start streaming measurement
Stream *stream = [spring track:adapter atts:atts];
...
// stop measurement programmatically
[stream stop];
If the stream should be measured again, when the application comes to the foreground or after the method stop has been called, the method track must be called again.
Foreground- and Background Actions
Once the application is in the background all measurements in the library are stopped, i.e. when the application goes to the foreground, the measurement on a stream must be restarted.
Ending the application
If the application is closed, the method unload can be called. This call sends the current state of the measurements to the measuring system and then terminates all measurements. This method is automatically called by the library, when the application goes into the background.
...
[[KMA_SpringStreams getInstance] unload];
Appendix A
In the following example, the adapter has been implemented for the media player from the standard API.
//
//  KMA_MediaPlayerAdapter.m
//  KMA_SpringStreams
//
//  Created by Frank Kammann on 26.08.11.
//  Copyright 2011 spring GmbH & Co. KG. All rights reserved.
//

#import "KMA_SpringStreams.h"

/**
 * Implementation of a KMA_StreamAdapter.
 *
 * @see KMA_StreamAdapter
 */
@implementation KMA_MediaPlayerAdapter

AVPlayerViewController *controller;
KMA_Player_Meta *meta;

/**
 * Initialize the adapter with the MPMoviePlayerController
 *
 * @see http://developer.apple.com/library/ios/#documentation/mediaplayer/reference/MPMoviePlayerController_Class/Reference/Reference.html
 *
 */
- (KMA_MediaPlayerAdapter*)adapter:(AVPlayerViewController *)player {
    //if (self) {
        meta = [[KMA_Player_Meta alloc] init];
        meta.playername = @"AVPlayerViewController";
        controller = player;
    //}
    return [super init];
}

/**
 * Returns the meta object.
 *
 * @see MediaPlayerMeta
 */
- (KMA_Player_Meta*) getMeta {
    return meta;
}

/**
 * Returns the current position on the KMA_Stream in seconds by calling
 * the method MPMediaPlayback.currentPlaybackTime
 *
 * @see http://developer.apple.com/library/ios/#documentation/mediaplayer/reference/MPMediaPlayback_protocol/Reference/Reference.html#//apple_ref/occ/intf/MPMediaPlayback#
 */
- (int) getPosition {
    int position = CMTimeGetSeconds(controller.player.currentItem.currentTime);
    // in initialize phase in controller this value is set to -2^31
    if(position < 0) position = 0;
    return position;
}

/**
 * Returns the duration of the KMA_Stream in seconds by calling
 * the method MPMediaPlayback.duration.
 *
 */
- (int) getDuration {
    return CMTimeGetSeconds(controller.player.currentItem.duration);
}

/**
 * Returns the width by the controller view.
 *
 * @return contoller.view.bound.size.width
 */
- (int) getWidth {
    return controller.view.bounds.size.width;
}

/**
 * Returns the height by the controller view.
 *
 * @return contoller.view.bound.size.height
 */
- (int) getHeight {
    return controller.view.bounds.size.height;
}

@end


@implementation KMA_Player_Meta

/**
 * Returns the player name
 *
 * @return the string "MediaPlayer"
 */
@synthesize playername;

/**
 * Returns the player version.
 * The itselfs has no version so the system version is delivered.
 *
 * @see http://developer.apple.com/library/ios/#documentation/uikit/reference/UIDevice_Class/Reference/UIDevice.html
 *
 * @return The version my calling [UIDevice currentDevice].systemVersion
 */
@synthesize playerversion;

/**
 * Returns the screen width my calling the method
 * [[UIScreen mainScreen] bounds].screenRect.size.width
 *
 * @see http://developer.apple.com/library/ios/#documentation/uikit/reference/UIScreen_Class/Reference/UIScreen.html
 *
 * @return the width
 */
@synthesize screenwidth;

/**
 * Returns the screen width my calling the method
 * [[UIScreen mainScreen] bounds].screenRect.size.height
 *
 * @see http://developer.apple.com/library/ios/#documentation/uikit/reference/UIScreen_Class/Reference/UIScreen.html
 *
 * @return the height
 */
@synthesize screenheight;

- (id) init {
    self = [super init];
    if (self) {
        self.playername = @"iOS Player";
        self.playerversion = [UIDevice currentDevice].systemVersion;

        CGRect screenRect = [[UIScreen mainScreen] bounds];
        self.screenwidth = screenRect.size.width;
        self.screenheight = screenRect.size.height;
    }
    return self;
}

- (id) copyWithZone:(NSZone *)zone {
    id copy = [[[self class] alloc] init];

    if (copy) {
        // Copy NSObject subclasses
        [copy setPlayername:[self.playername copyWithZone:zone]];
        [copy setPlayerversion:[self.playerversion copyWithZone:zone]];

        // Set primitives
        [copy setScreenwidth:self.screenwidth];
        [copy setScreenheight:self.screenheight];
    }
    return copy;
}

- (NSString *)description {
    return [NSString stringWithFormat:@"Meta pl=%@ plv=%@ sx=%ld sy=%ld",
            self.playername,
            self.playerversion,
            (long)self.screenwidth,
            (long)self.screenheight];
}

- (void)encodeWithCoder:(NSCoder *)encoder {
    [encoder encodeObject:self.playername forKey:@"playername"];
    [encoder encodeObject:self.playerversion forKey:@"playerversion"];
    [encoder encodeInt:self.screenwidth forKey:@"screenwidth"];
    [encoder encodeInt:self.screenheight forKey:@"screenheight"];
}

- (id)initWithCoder:(NSCoder *)decoder {
    self.playername = [decoder decodeObjectForKey:@"playername"];
    self.playerversion = [decoder decodeObjectForKey:@"playerversion"];
    self.screenwidth = [decoder decodeIntForKey:@"screenwidth"];
    self.screenheight = [decoder decodeIntForKey:@"screenheight"];
    return self;
}

@end
Implementation of the URL Scheme in iOS
Generally for spring measuring purpose, only some modifications need to be applied in your App, if a Panel App is used in your market.
(This blog may assist your implementation):
Register the URL Scheme accordingly.
In order to register your URL Scheme into your iOS App, you need to edit the Info.plist file under the "Supporting Files" in your project folder, two ways:
you can edit it in any editor, if you do so, please insert the following code:
	<key>CFBundleURLTypes</key>
	<array>
		<dict>
			<key>CFBundleURLName</key>
			<string>***</string>      //please change *** to your URL name, not so important
			<key>CFBundleURLSchemes</key>
			<array>
				<string>***</string>  //very important, please replace
			</array>
		</dict>
	</array>
Or you can edit this in xcode, add an item into
Info.plist, named "URL types", expand "Item 0" under "URL types", and add two items: "URL identifier", "URL Schemes".For "URL identifier", assign your identifier, and for "URL Schemes", add a new item within it named "Item0", REGISTER A UNIQUE URL SCHEME FOR YOUR APP, VERY IMPORTANT!
It should be like the following:

How to use the different Files in the Library Package
| File | Description |
|---|---|
| spring-appsensor-device.a | This is the version that has been compiled with ARM support and which is intended for execution on iOS devices |
| spring-appsensor-simulator.a | This is the version that has been compiled with x86 support and which is intended for execution on iOS simulator |
| spring-appsensor-fat.a | This is a combined version of the two libraries above, which can be executed on both, iOS devices and iOS simulator because it contains code for ARM and x86 execution. This file is called "fat" as it is roughly double the size (because it combines both versions). |
If size does not matter for the app, the "fat" version is the carefree option to be used for execution on simulator and real devices.
Tutorial on how to import KMA measurement Objective-C library into Swift project
In this tutorial, you will find how to import KMA measurement Objective-C library into your Swift project.
The sample will be given with KMA tagging library, the steaming library will be very similar, please adapt the changes on your own project.
- Import the library into your project as before:
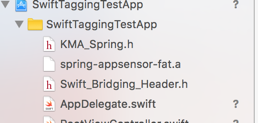
- If you want to import the Objective-C static library into your project, you will need a Bridging-Header file. In your project, create a new file, header file, the content will be like this:
you will need <Foundation/Foundation.h> and import "KMA_Spring.h" or "KMA_SpringStreams"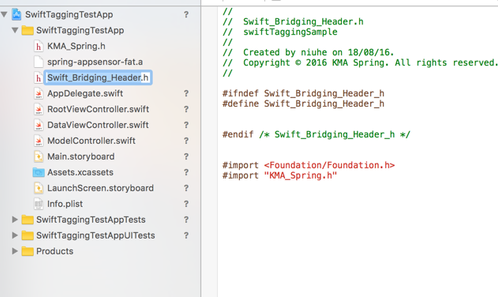
- After import the library in, you will have to link the bridging file as the Objective-C Bridging header in your project,
the setting is in 'Build Settings', search for "Objective-C Bridging Header", and drag the bridging header file in.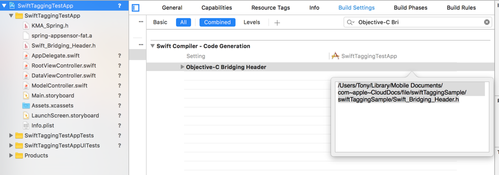
The first 3 steps will allow you the access to the library, the rest will be the implementation in your code just like before:
    var springsensor: KMA_Spring?

    func application(application: UIApplication, didFinishLaunchingWithOptions launchOptions: [NSObject: AnyObject]?) -> Bool {

        springsensor = KMA_Spring(siteAndApplication: "test",application: "testapp");

        springsensor?.debug = true;

        springsensor?.ssl = true;

        let map: NSDictionary = ["stream":"testApp", SPRING_VAR_ACTION:SPRING_APP_STARTED]

        springsensor?.commit(map as [NSObject : AnyObject])

        // Override point for customization after application launch.

        return true

    }
All the resources can be downloaded here:
For tagging: Swift_Bridging_Header.h
For Streaming: Swift_Bridging_Header_Streaming.h
Streaming Measurement in Android
This chapter describes the basic use of the sensor for the measurement of streaming content.
Properties of the Library
| Property | Default | Description |
|---|---|---|
| tracking | true | If this property is set to |
| offlineMode | false | If this property is set to |
| debug | false | If the value is set to true, the debug messages are issued by the library. |
| timeout | 10 | Timeout Setting for the HTTP-Request. |
Lifecycle of the Measurement
This chapter explains step by step the use of the sensor and the measurement of streaming content . The following steps are necessary in order to measure a content.
- Generating the sensor
- Implementation of the adapter
- Beginning of the measurement
- End of the measurement
Generating the Sensor
When you start the app the sensor must be instantiated once. It is not possible to change the site name or the application name after this call.
String site = ...;    // will delivered by the measurement provider
Spring appName = ...; // will delivered by the measurement provider
SpringStreams sensor = SpringStreams.getInstance(site, appName, getApplicationContext());
The site name and application name is specified by the operator of the measurement system.
Implementation of the Adapter
In principle it is possible to measure any media library with an adapter, that is available within an app to use streaming content .
Therefore the protocol Meta and the interface StreamAdapter must be implemented. The meta object supplies the information regarding the used player, the player version and the screen size.
The library must be able to read continuously the current position on a stream in seconds or the current position of player.
package de.spring.mobile;
/**
* This adapter must be used to support some players by the library.
*
* @see Meta
* @see SpringStreams
* @see SpringStreams#track(StreamAdapter, java.util.Map)
*
* @author <a href="mailto:support@spring.de">spring GmbH & Co.KG</a>
*/
public interface StreamAdapter {
public interface Meta {
public String getPlayerName();
public String getPlayerVersion();
public int getScreenWidth();
public int getScreenHeight();
}
public Meta getMeta();
public int getPosition();
public int getDuration();
public int getWidth();
public int getHeight();
}
Beginning of the Measurement
This chapter explains step by step how a streaming content is transferred to the library for the measurement.
In the library an adapter for class android.widget.VideoView
The source code for this implementation can be found in Appendix A and in the library.
The following code block shows an example for the use of the library.
// Create a sensor once in the application
SpringStreams sensor = SpringStreams.getInstance(site, appName, getApplicationContext());
...

public MyVideoActivity extends Activity {

	private static SpringStreams sensor;
	private Stream stream;

	public MyVideoActivity(SpringStreams sensor) {
		if(MyVideoActivity.sensor == null)
			MyVideoActivity.sensor = sensor;
	}

	@Override
	protected void onStart() {
		Map<String, Object> atts = new HashMap<String, Object>();
		atts.put("stream", "android/teststream"); // mandatory
		// atts.put("cq", "4711"); // optional see implementation guideline
		// atts.put("ct", "mobile"); // optional see implementation guideline
		stream = sensor.track(new VideoViewAdapter(this.videoView), atts);
		super.onStart();
	}

	@Override
	protected void onStop() {
		stream.stop();
		super.onStop();
	}

	...
}
First, the player and the object needs to be instantiated, that is able to deliver the current position on a stream in seconds. In the second step the adapters must be produced, which implements this requirement accurately.
Then an NSDictionary is generated in order to formulate more detailed information about the stream. Therefore the attribute stream must always be specified
The attribute stream is always required and must be specified for each measurement
Next, the method track is called with the adapter and the description property of the stream. From this point on, the stream is measured by the library as long as the application remains in foreground and the measured data are cyclically transmitted to the measuring system.
When the application goes into the background , all measurements are stopped and closed, i.e. when the application comes to the foreground again, the method track must be called again.
A stream is measured as long as the Activity is in the foreground. When the Activity goes into the background, the current status is transmitted to the measurement system and the measurement stops. If the stream should be measured again, when the application will come back to the foreground, the method track must be called again.
End of the Measurement
After the measurement of a stream has been started, this stream is measured by the sensor. The measurement can be stopped by calling the method stop on the stream object. All measurements will be automatically stopped by the library, when the application goes into the background.
// start streaming measurement
Stream *stream = sensor.track(adapter, atts);
...
// stop measurement programmatically
stream.stop();
If the stream should be measured again, when the Activity comes to the foreground or after the method stop has been called, the method track must be called again.
Ending the application
If the application is closed, the method unload can be called. This call sends the current state of the measurements to the measuring system and then terminates all measurements. This method is automatically called by the library, when the application goes into the background.
...
sensor.unload();
Using the SpringStreamsActivity
In the library is a SpringStreamsActivity included, that can be used to largely automate the measurement. The source code of this class can be found in Appendix B and in the library.
public class VideoPlayer extends SpringStreamsActivity {

	VideoView videoView;

	/**
	 *
	 */
	public VideoPlayer() {
		super("test", "Streaming Test App");
	}


	public void onCreate(Bundle savedInstanceState) {
		super.onCreate(savedInstanceState);

		videoView = ...;
	}

	@Override
	protected void onStart() {
		Map<String, Object> atts = new HashMap<String, Object>();
		atts.put("stream", "android/teststream");
		super.track(new VideoViewAdapter(this.videoView), atts);
		super.onStart();
	}
}
ProGuard
Please Note: If you are using ProGuard, our library could be compromised.
Therefore it is necessary to add the following lines into the ProGuard configuration file:
# Keep spring files
-keep class de.spring.** { *; }
# Keep spring files
-keep class de.spring.** { *; }
-keep class org.apache.** { *; }
If you want to suppress the warnings regarding library-program-class-dependencies , please add to the configuration file
-dontwarn android.webkit.WebView
-dontwarn android.webkit.WebViewClient
Appendix A
In the following example, the adapter has been implemented for the VideoView from the standard API.
/**
* Implementation of an adapter for the {@link VideoView} in standard
* android api.
*
* @author <a href="mailto:support@spring.de">spring GmbH & Co.KG</a>
*/
public class VideoViewAdapter implements StreamAdapter {
private VideoView videoView;
public VideoViewAdapter(VideoView videoView) {
if(videoView == null)
throw new NullPointerException("videoView may not be null");
this.videoView = videoView;
}
@Override
public Meta getMeta() {
return new Meta() {
public String getPlayerName() {
return "android.widget.VideoView";
}
public String getPlayerVersion() {
return Build.VERSION.RELEASE;
}
public int getScreenHeight() {
return (((WindowManager)videoView.getContext().getSystemService(Context.WINDOW_SERVICE))
.getDefaultDisplay()).getHeight();
}
public int getScreenWidth() {
return (((WindowManager)videoView.getContext().getSystemService(Context.WINDOW_SERVICE))
.getDefaultDisplay()).getWidth();
}
};
}
@Override
public int getPosition() {
return (int)Math.round(videoView.getCurrentPosition()/1000.0);
}
@Override
public int getDuration() {
return (int)Math.round(videoView.getDuration()/1000.0);
}
@Override
public int getWidth() {
return videoView.getWidth();
}
@Override
public int getHeight() {
return videoView.getHeight();
}
}
Appendix B
The source code of class SpringStreamsActivity
package de.spring.mobile;
import java.util.Map;
import android.app.Activity;
import android.os.Bundle;
/**
*
* @author <a href="mailto:support@spring.de">spring GmbH & Co.KG</a>
*/
public abstract class SpringStreamsActivity extends Activity {
private static SpringStreams sensor;
private static int instances = 0;
private Stream stream;
public SpringStreamsActivity(String site, String appName) {
this(site, appName, 10);
}
public SpringStreamsActivity(String site, String appName, int timeout) {
if(site == null) throw new NullPointerException("parameter site may not be null");
if(appName == null) throw new NullPointerException("parameter appName may not be null");
if(sensor == null) {
sensor = SpringStreams.getInstance(site, appName, getApplicationContext());
sensor.setTimeout(timeout);
}
}
public Stream getStream() {
return stream;
}
public void setSensorDebug(boolean debug) {
sensor.setDebug(debug);
}
public boolean isSensorDebug() {
return sensor.isDebug();
}
public void setTracking(boolean tracking) {
sensor.setTracking(tracking);
}
public boolean isTracking() {
return sensor.isTracking();
}
public void track(StreamAdapter adapter, Map<String, Object> atts) {
if(this.stream != null) {
stream.stop();
stream = null;
}
stream = sensor.track(adapter, atts);
}
/**
* @see android.app.Activity#onCreate(android.os.Bundle)
*/
@Override
protected void onCreate(Bundle savedInstanceState) {
instances++;
super.onCreate(savedInstanceState);
}
/**
* @see android.app.Activity#onStop()
*/
@Override
protected void onStop() {
if(stream != null) {
stream.stop();
stream = null;
}
super.onStop();
}
/**
* @see android.app.Activity#onDestroy()
*/
@Override
protected void onDestroy() {
instances--;
if(instances <= 0) {
sensor.unload();
sensor = null;
stream = null;
}
super.onDestroy();
}
}
App Streaming Measurement Off-line Mode (if supported by your library version)
This chapter describes the basic working of the sensor for the measurement of streaming content in off-line mode.
As soon as the offlineMode is set to true, the following behavior of the library will change:
Properties of the offline-mode in the library:
- Requests to the measuring system pass through an internal persistent ring buffer.
- The ring buffer can contain up to 500 entries.
- The ring buffer persists even after the Application is closed.
- The rule for the ring buffer is "FIFO": First in, First out.
- If the buffer is full, the oldest request will be replaced.
How the library acts when offline-mode is enabled:
- The device will keep trying to empty the ring buffer by attempting to send requests to the measuring system.
- When there is a connection, the requests seamlessly pass through the ring buffer.
- When there is no connection, the requests will be retained indefinitely.
- Within a single viewing session, only the last request of the session is kept in the ring buffer. This one request contains all the information of the entire viewing session.
How and when to use the offline-mode:
We recommend that you switch on the offline-mode only when downloaded content is being played (regardless if the device has an active and functioning internet connection).
Streaming Measurement in Cordova
This chapter describes the basic use of the JavaScript sensor for the measurement of streaming content with the Cordova framework.
The following platforms are supported with this method:
- Android
- iOS
Other target platforms may work, but are not tested and therefore considered as not supported.
Notice
This approach cannot be tested in "browser" mode.
If this sensor detects "browser" as the target platform it defaults to the HTML5 sensor implementation of the pure JavaScript sensor.
Integration
Add plugins to config.xml
The integration requires a few dependencies to be installed within the config.xml of the Cordova-based project.
    <plugin name="cordova-plugin-device" spec="~2.0.3" />
    <plugin name="cordova-plugin-idfa" spec="~1.1.0">
        <variable name="PLAY_SERVICES_ADS_VERSION" value="15.0.+" />
    </plugin>
    <plugin name="cordova-plugin-app-version" spec="^0.1.9" />
    <plugin name="cordova-plugin-file" spec="~6.0.2" />
    <plugin name="cordova-plugin-advanced-http" spec="~2.2.0" />
They need to go below the closing of the last </platform>.
Example:
<platform name="android">
        <allow-intent href="market:*" />
</platform>
<platform name="ios">
        <allow-intent href="itms:*" />
        <allow-intent href="itms-apps:*" />
</platform>

<plugin name="cordova-plugin-device" spec="~2.0.3" />
<plugin name="cordova-plugin-idfa" spec="~1.1.0">
  <variable name="PLAY_SERVICES_ADS_VERSION" value="15.0.+" />
</plugin>
<plugin name="cordova-plugin-app-version" spec="^0.1.9" />
<plugin name="cordova-plugin-file" spec="~6.0.2" />
<plugin name="cordova-plugin-advanced-http" spec="~2.2.0" />
Install plugins and its dependencies
To install these plug-ins, use Cordova's prepare.
cordova prepare
Output (Sample):
Plugin 'cordova-plugin-device' found in config.xml... Migrating it to package.json
Plugin 'cordova-plugin-idfa' found in config.xml... Migrating it to package.json
Plugin 'cordova-plugin-app-version' found in config.xml... Migrating it to package.json
Plugin 'cordova-plugin-file' found in config.xml... Migrating it to package.json
Plugin 'cordova-plugin-advanced-http' found in config.xml... Migrating it to package.json
Discovered saved plugin "cordova-plugin-device". Adding it to the project
Installing "cordova-plugin-device" for android
Installing "cordova-plugin-device" for ios
Discovered saved plugin "cordova-plugin-idfa". Adding it to the project
Installing "cordova-plugin-idfa" for android
Installing "cordova-support-android-plugin" for android
Subproject Path: CordovaLib
Subproject Path: app
Installing "cordova-plugin-idfa" for ios
Discovered saved plugin "cordova-plugin-app-version". Adding it to the project
Installing "cordova-plugin-app-version" for android
Installing "cordova-plugin-app-version" for ios
Discovered saved plugin "cordova-plugin-file". Adding it to the project
Installing "cordova-plugin-file" for android

The Android Persistent storage location now defaults to "Internal". Please check this plugin's README to see if your application needs any changes in its config.xml.

If this is a new application no changes are required.

If this is an update to an existing application that did not specify an "AndroidPersistentFileLocation" you may need to add:

      "<preference name="AndroidPersistentFileLocation" value="Compatibility" />"

to config.xml in order for the application to find previously stored files.

Installing "cordova-plugin-file" for ios
Discovered saved plugin "cordova-plugin-advanced-http". Adding it to the project
Installing "cordova-plugin-advanced-http" for android
Plugin dependency "cordova-plugin-file@6.0.2" already fetched, using that version.
Dependent plugin "cordova-plugin-file" already installed on android.
Subproject Path: CordovaLib
Subproject Path: app
Installing "cordova-plugin-advanced-http" for ios
Plugin dependency "cordova-plugin-file@6.0.2" already fetched, using that version.
Dependent plugin "cordova-plugin-file" already installed on ios.
Alternative: Install plugins via "cordova plugin"
Alternatively the plug-ins can be installed manually:
cordova plugin add cordova-plugin-device
cordova plugin add cordova-plugin-idfa
cordova plugin add cordova-plugin-app-version
cordova plugin add cordova-plugin-file
cordova plugin add cordova-plugin-advanced-http
Content-Security-Policy:
It is vital to permit external connections to the provided tracking site i.e.:
connect-src test.2cnt.net;
![]()
test = The site code in this case is “test”. You have to replace the site code “test” by the site code (unique name provided by Kantar) for the measured site.
This includes loading images from that site, i.e.:
img-src test.2cnt.net;
Inline same-origin scripts also need to be allowed:
script-src 'self' 'unsafe-inline';
Implementation
The sensor's script (SpringStreams.js) needs to be added to the project at:
www/js/springstreams.js
The rest of the integration works as stated in Basic Use of the API, with some key differences.
The location to load the sensor script from will not include the www as stated in the path above.
<script src="js/springstreams.js"></script>
To work with Cordova, the track method requires the HTML5CordovaAdapter as adapter argument:
//Sensor tracking
sensors.track(document.getElementById('video'), description, sensors.HTML5CordovaAdapter);
Example Integration
The following integration shows a complete integration on a simple HTML page.
<html>
    <head>
        <meta http-equiv="Content-Security-Policy" content="default-src 'self' data: gap: https://ssl.gstatic.com 'unsafe-eval'; connect-src *.2cnt.net; script-src 'self' 'unsafe-inline'; style-src 'self' 'unsafe-inline'; media-src *; img-src 'self' data: content:;">
        <meta name="format-detection" content="telephone=no">
        <meta name="msapplication-tap-highlight" content="no">
        <meta name="viewport" content="initial-scale=1, width=device-width, viewport-fit=cover">
        <link rel="stylesheet" type="text/css" href="css/index.css">
        <!-- Sensor javascript file -->
        <script src="js/springstreams.js"></script>
        <!-- Sensor initialization -->
        <script type="text/javascript">
            var sensors = new SpringStreams("test");
        </script>
        <title>Hello World</title>
    </head>
    <body>
        <div>
            <h1>Apache Cordova</h1>
            <!-- http://camendesign.com/code/video_for_everybody/test.html -->
            <video width="100%" id="video" src="http://clips.vorwaerts-gmbh.de/big_buck_bunny.mp4" controls />
            <script type="text/javascript">
                document.addEventListener("deviceready", function () {
                    //Sensor description
                    var description = {
                        "stream": "MyVideoName"
                    };
                    //Sensor tracking
                    sensors.track(document.getElementById('video'), description, sensors.HTML5CordovaAdapter);
                }, false);
            </script>
        </div>
        <script type="text/javascript" src="cordova.js"></script>
        <script type="text/javascript" src="js/index.js"></script>
    </body>
</html>
Information (optional)
The user can be informed at some point that the application monitors the user actions and transmits them to a measuring system. Furthermore, the user must be informed that he has the possibility to switch of the tracking in the application and can contradict this way. (see: Implementation of Stream Measurement#Opt-Out)
For this purpose, you can include data privacy information in your language into an appropriate place of your app implementation:
Our app uses the "mobile app streaming sensor" of Kantar Media spring, Saarlouis, Germany, to gather statistics about the usage of our site. This data is collected anonymously.
This measurement of the mobile usage uses an anonymized device identifier for recognition purposes. To ensure that your device ID can not be clearly identified in our systems, it is encrypted and will be reduced by half. Only the encrypted and shortened device identifier is used in this measurement context.
This mobile measurement was developed under the observance of data protection laws. The aim of the measurement is to determine the intensity of use, the extent of use and the number of users of a mobile application. At no time, individual users will be identified. Your identity is always protected. You get no advertising by this system.
You can opt-out of the measurement by our app with the following activation switch.
Please note that only the measurement of our app is disabled. It may be that you will continue to be measured by other broadcasters using the "mobile app streaming sensor".
Mobile App Streaming Sensor Measurement: |On/Off|
Opt-Out
The application developer can give users the ability to stop the further tracking of the user actions. For this purpose the library offers the following methods:
/**
 * When the value <code>false</code> is specified, the sending of
 * requests to the measuring system is switched off.
 * This value is <code>true</code> by default.
 */
public void setTracking(boolean tracking) { }
/**
 * Delivers the value <code>true</code> when the tracking
 * is activated otherwise the value is <code>false</code>.
 */
public boolean isTracking() { }
A persistent saving of the opt-out decision in the library is not provided and needs to be implemented by the app developer.